Friday, June 17, 2016

Installing a Backsplash


Last weekend Eric and I installed a backsplash in our kitchen! This was our first time working with any sort of tile and I have to say, it wasn't too too difficult. We definitely made mistakes along the way.. but my rationale for installing a backsplash (even though we're moving) was that it would be easier to learn in a small space, with a less expensive tile, than in our new kitchen. Below are a few photos I took of the process... Ignore the crookedness, I haven't mastered interior photography yet!


The overall project cost us around $120 (it would have cost it quite a bit more, but luckily I have a friend who works at Rona, and I was able to score an employee discount on a lot of products). 

From Rona, we purchased:
- 2 Boxes of tiles (it was JUST enough for the space)
- Tile Adhesive 
- A Plastic Trowel (to apply the adhesive on the wall)
- A metal Spreader (to distribute the adhesive evenly on the wall)
- Tile Spacers
- Grout
- Grout sponge
- Painters tape (great for holding the tiles together on the mesh sheets when cutting the tile)
- 4 Nuts (we actually put nuts behind the outlet plate to get it to sit flush with the tile)

Not included in the above price was the wet saw we had to purchase to cut the marble. We thought about renting a wet saw, but since we are planning on doing tile work in our new house, we figured buying would be the best option, especially since we found a wet saw for only $70 at Canadian Tire (and it doesn't cost us anything because we happened to have money leftover on a gift card we got from wedding). 


After cutting the bottom of each tile to sit flush with the countertop, we lay the first tile. I have to admit, we cut the tile quite crooked and it did not sit flush with the wall.. but with the magic of grout, you can't really tell how not straight it was. We managed to get around the electrical outlets simply by taking a pair of scissors and cutting the tiles from the mesh. I messed up this part a little, as there's currently a small gap around one of the outlets.. but we're hoping on one but us notices.


This is what the tiles looked like at the end of day one. We anxiously awaited the recommended 24 hours before applying the grout the next day. 


Applying the grout was surprisingly quick and easy.  One tip we got from a a friend was "when you think you've finished cleaning off the grout, clean it off 3 more times" and that we did. We probably cleaned the backsplash about 12 times after we applied the grout! Because of this, we had no problem with the backsplash looking hazy (apparently it's tough to get off if you let the grout dry too long). My only worry about the grout was that it looked quite dark when we applied it (as you can see in the picture), but I am happy to report, the grout dried white! 


And voila! The kitchen is done. I'm hoping to pick up some little decor accessories to pretty up the kitchen, but I need to be careful not to crowd our limited counters pace with a bunch of stuff.


And that's it! Take care!

Sunday, June 05, 2016

Our Current Home: Kitchen

I have been obsessing over our new house so much lately that I haven't been giving our current house much love. Even though we won't be selling our home until this time next year, I want to complete all of our half-started projects so that the house is put together when it comes time to sell.

Our current house was also a new-build, which of course meant that I got to pick out all our finishes. We only had $5K budgeted in upgrade money for the entire house so I tried to pick things that were economical and would add the most value for resale.

For our kitchen, we ended up upgrading the cabinets and hardware to a more expensive line (this was the most important upgrade IMO - the standard cabinets had a bumpy texture which looked cheap)! We also upgraded to a package that included fridge gables, extending the cabinets over the fridge, valences for future lighting and pots & pan drawers (so glad we got these; the drawers offer so much storage)! For cost reasons, we decided to go with laminate until we could afford to upgrade. However, siiiince we decided to buy another new-build last November, we scratched that idea.

We debated on installing quartz countertops to add value to our home, but we live in an area where house inventory is low, so I don't think we will have any trouble selling our house (I hope).

With regards to "completing" our kitchen, my husband installed pendant lights over the island the Christmas before last. And we recently decided to install a backsplash on a whim I found a marble backsplash at Rona today and got an amaaazing deal on it (all the tiles and supplies for under $100!). My husband wasn't super enthused when I came home with backsplash supplies since we're moving next year, but I think it will look great!! And who knows, maybe it will add value to the home. I've also never worked with tiles in any form before, so I think given that the area I'm working with is pretty small, it will be a great opportunity for practice!

Below is the design plan for my kitchen (pretty much all of these items I already own or I have something similar). I will post pictures once the backsplash has been installed! Take care!


Monday, May 30, 2016

The White Fireplace

We chose two structural upgrades for our new home: the chef's kitchen and the addition of a fireplace in the Great Room. There were many other upgrades we would have loved to add (glass standing shower, bigger windows in the basement.. etc.) but with the goal of keeping the architectural budget under 10K, we felt these two upgrades would add the most value to our home. I have never had a fireplace before, so I am really looking forward to not only having somewhere to cozy up in the winter, but also having a pretty focal point in the family room.

Below is the basic white fireplace we will be getting. It's nothing special, but I kind of like how simple it is. We will likely add a backsplash to the mantle to glam it up, but there are so many beautiful tile options, I'm not sure how I'll narrow it down!


Here are a few of my favourite white fireplaces right now!


Source: Caitlin Wilson

Talk to you later!

Sunday, May 29, 2016

The Design Plan: The Kitchen Plan

Since the kitchen is the "heart of the home," and where we'll spend the bulk of our upgrade money, I decided to start on our kitchen design plan. I am constantly changing my mind as I see new inspiration! I can't decide if I want to go with a more "traditional" look, or if I prefer a more "modern" vibe. Hopefully I can find a way to mix and match from the different inspiration I am seeing soon. We will have to make some decision in the next few months because I expect we'll have to chose our upgrades this summer.

While we will are planning on using a lot of our upgrade budget in the kitchen, our budget can only go so far... So right now, the marble countertops and farmhouse sink are a bit of a pipe dream, but this plan gives an overall idea of the look i'm going for.

Below are some of my ideas, but I'm sure they will change before we have to make the final decision!


Take care!

Wednesday, May 18, 2016

DIY: Wedding Favours

Going the DIY route is not only a great way to save money when planning your wedding, but it also adds a personal touch to your wedding and working on the projects can be a lot of fun.

For me, DIY projects were a great way to ensure everything coordinated with each other and kept in the same theme. Eric, and I were engaged for just over a year and a half, so I had a lot of time to experiment with different ideas and get everything done on time for the big day.

One of our most complimented DIY projects was our wedding favours. We didn't want to do anything extravagant for favours (as we heard most guests throw away wedding favours anyway), so we figured something edible was cost efficient and wouldn't go unappreciated.


The materials used to complete this DIY include:
  • Ivory Favour Boxes - purchased from eBay (approx. $25)
  • Ivory Card stock Paper - purchased from Michaels (approx. $20)
  • Champagne/Gold Ribbon - purchased from Michaels (approx. $25)
  • White and Gold Tulle - purchased from Michaels (approx. $25)
  • Martha Stewart "Flourish Frame" Punch - purchased from Michaels (can also be found here) (approx $25)
  • Purple Tissue Paper - purchased from Dollarama (approx. $4)
  • Lindor Chocolates - purchased from Lindt - (approx. $150) 
  • Hot glue gun (already owned)
We made about 115 boxes, but had enough supplies to make plenty more.

Instructions

Step 1: Assemble boxes as per the instructions provided.

Step 2: If you need to fill space in the box, use shredded tissue paper, then add the favour and close.


Step 3: Wrap each box with ribbon (use a few drops of hot glue to keep the ribbon in place)

Step 4: Print desired text on cardstock (I added our names, wedding date and a swirley graphic). Use a fancy punch to cut the card tock into shapes. Hot glue the shape to the ribbon on the box.

Step 5: Create tulle flowers using the method below and hot glue the flower to the box.
1. Cut tulle into tonnes and tonnes of little square boxes (about 4x4 inches).
2. Fold each square about 4 times until it becomes a small triangle.
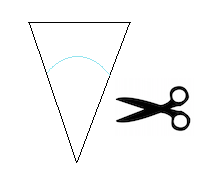
3. Cut a petal shape out of the triangle.

4. Open the cut out to reveal a flower shape.
5. Repeat these steps what will seem like a million times.
6. Place the tulle flower shapes (about 6 or 7) on top of each other, rotating each flower layer.
7. Once you have gotten your desired look, pinch the center of the flower, grabbing all the layers and staple (this will give it extra holding powder). Add a little hot glue to the center of the box and attach the flower, and voila!

Happy DIY-ing!


Sunday, May 15, 2016

Our Wedding!

Eric and I got married on July 25, 2015 at the beautiful Hockley Valley Resort in Mono, Ontario. Even though there was lots of rain in the forecast, we were blessed with only a few drops the whole day, which we are extremely grateful for (given that our wedding was outdoors)!.

As we are quickly approaching our one year anniversary, I figured it was finally time to post some of these photos. I cannot believe how much time has passed! Below are a few of my favourite photos taken by our lovely and talented photographer, Johanne. 


***In no way am I claiming these photos to be my own work. Slight edits were made to fit them on the blog.

Take care!